
So you’ve already got permits secured to hike to the most remote village in the lower 48 states? Well that means you’re persistent and can do difficult things so you’re already WELL prepared to hike down into Havasupai. It’s almost time to explore the beautiful area that includes Havasu Falls, Beaver Falls, the Confluence, and more! And now, because you’re like me, you’re in research mode figuring out what to expect from your hike to Havasupai. Luckily, that’s where I come in to help you prepare for this trek to Supai Village and beyond. So, here are my top Havasupai hike tips to help you best prepare for this unique backpacking trip!
Also, of note, I did not hike to Confluence. So none of these tips for Havasupai will include help there.

The Short Version of 27 Havasupai Tips
- Leave no trace; if you pack it in be sure to pack it out
- The Hilltop parking lot is small and fills up FAST, so get there really early or really late
- Avoid hiking in and out of the canyon in the direct sunlight; leave SUPER early in the morning or start late to hike at night
- Set up camp closer to Mooney Falls for more space, shade, and a prettier (if possible) environment
- Bring wet wipes so you can at least attempt to feel clean with a little mini-bath every night
- Wear a sturdy hiking boot/shoe for the hike in/out of the canyon and a hiking sandal or water shoe for hikes in the canyon
- Definitely bring cash for the frybread, the cafe, or anything you might want to snag from the village
- Get the Frybread
- Havasu Falls and Beaver Falls are really great for swimming
- Bring a collapsible water container for once you get to the campsite
- There are tons of items by the ranger station (like gas, bug spray, etc.) that people have left behind that you can use
- The far left stall in each bathroom has storage and a ton of toilet paper
- The hike to Mooney Falls is truly as sketchy as they say
- Wear your sturdy hiking boots/shoes for Mooney Falls, then switch to sandals or water shoes for the hike to Beaver Falls
- Prepare and be ready for multiple river crossings
- Download the hiking trail all the way to the Confluence on AllTrails
- Don’t count on the helicopter to get you out
- Check the weather and pack for potentially chilly nights
- Do some good stretching as soon as you get in from the hike down
- If you’re planning on buying supplies from the village, do that on your hike down
- Join the Havasupai Tribe Tourism and the Havasupai and Havasu Falls Facebook groups
- You won’t have cell service in the campsite or on the trails, so bring some sort of satellite communication device
- Pack clothes that don’t wrinkle or smell
- Bring something to entertain yourself with; a deck of cards, a book, etc.
- Utilize your red light on your lanterns and headlamps at night
- Don’t be an asshole; respect people’s campsites and their space
- The hike out is hard but if you’re used to high elevations it might not be as hard as you’re expecting
- The Short Version of 27 Havasupai Tips
- The Long Version of Tips for the Havasupai Hike – Things to Know Before You Go
- 1 – Leave No Trace
- 2 – Hilltop Parking Lot Fills Up Fast
- 3 – Try to Avoid Hiking in Direct Sun
- 4 – Set Up Camp Closer to Mooney Falls
- 5 – Bring Wet Wipes
- 6 – Bring Hiking Boots/Shoes As Well As Water Shoes/Hiking Sandals
- 7 – Bring Cash
- 8 – Definitely Get the Frybread
- 9 – Havasu Falls and Beaver Falls Are Incredible Swimming Spots
- 10 – Bring a Collapsible Water Container for the Campsite
- 11 – Use the Items at the Ranger Station Left by Previous Campers You Can Use
- 12 – Far Left Bathroom Stall Is Storage
- 13 – The Mooney Falls Hike is As Sketchy As They Say
- 14 – Wear Sturdy Hiking Boots/Shoes for the Mooney Falls Descent & Switch Into Water Shoes or Sandals for the Rest of the Hike
- 15 – Prepare for Multiple River Crossings
- 16 – Download the Havasupai Hiking Trail Route on AllTrails
- 17 – Don’t Count on the Helicopter For a Ride Out
- 18 – Check the Weather & Prepare for Chilly Nights
- 19 – Once You Arrive to the Campground, Get a Good Stretch In
- 20 – Try to Buy Any Supplies You Might Need From Town On the Hike Down to Havasupai
- 21 – Join the Facebook Groups for More Tips & Announcements
- 22 – You Won’t Have Service So Bring a Satellite Device For Communication
- 23 – Pack Clothes That Don’t Smell or Wrinkle
- 24 – Bring Something to Entertain Yourself With
- 25 – Utilize Your Red Light for Lanterns and Headlamps at Night
- 26 – Don’t Take Over People’s Space or Picnic Tables Who Have Clearly Set Up Camp
- 27 – The Hike Out is Difficult, But Not As Difficult As I Expected Due to Lack of Elevation
- Posts Related to "Top Havasupai Hike Tips"
- Pin These Havasupai Tips for Later

The Long Version of Tips for the Havasupai Hike – Things to Know Before You Go
Alright, now let’s get into the nitty gritty. Here are my 27 top tips you should know for your time hiking into Havasupai and staying in the campgrounds. And as always, if you make any purchases via links included throughout these Havasupai tips, I might make a commission. However I would never recommend something to you I didn’t personally love or use !
1 – Leave No Trace
It’s that simple – if you bring it with you on the Havasupai hike, bring it back out with you. Here are the leave no trace principles if you’d like to brush up!
2 – Hilltop Parking Lot Fills Up Fast
We arrived to the Hilltop parking lot to start our Havasupai hike around 6:30am, and it was already full. We couldn’t park in the actual lot, we had to park along the street. But luckily that early arrival time had us still very close to the parking lot.
I noticed when we got back out at about 11 or 11:30am there were NO good spots. People were arriving to start their hike and they had to park very far away. They were having to hike another half or full mile in addition to the 10 mile trek down to the campgrounds beyond Supai. What I’d recommend is to leave as early in the morning as you can to beat the other hikers. OR later in the afternoon or evening after most of the hikers hiking out of Havasupai that day have left their spots.
3 – Try to Avoid Hiking in Direct Sun
In the same vein as the previous Havasupai tip – and the overall same recommendation – you’re going to want to avoid hiking in direct sunlight of the afternoon so you don’t overheat. So again, try and leave super early in the morning or later in the evening.
4 – Set Up Camp Closer to Mooney Falls
You’re going to be tempted to try and set up camp at the first good spot you see. While one could argue there are no bad campsites in the Havasupai campground, the best spots are back by Mooney Falls. This is probably the first Havasupai tip I tell people! It’s because the spots closer to Mooney Falls have more room, are in softer dirt, have more shade, and are in an overall prettier area (if you can even believe it).
5 – Bring Wet Wipes
These will save you from feeling like an absolute sweaty dirtball for four straight days. I did a wet wipe rubdown each night before bed and it felt SO nice to go to sleep feeling somewhat clean.
6 – Bring Hiking Boots/Shoes As Well As Water Shoes/Hiking Sandals
You spend a lot of the Havasupai hike clomping your way through gravel. I found my hiking boots to be an excellent choice for said clomping. However, you need to bring something better for walking through the river on your hikes to Mooney and Beaver Falls.
I’d recommend some good hiking sandals or light water shoes for that!
7 – Bring Cash
If you’re planning on purchasing anything while you’re in Supai, definitely bring a fair amount of cash. The Sinyella Store will take credit cards ($10 minimum) but everywhere else you’ll need to pay in cash. So for frybread and the little cafe for example, you’ll need cash.
8 – Definitely Get the Frybread
Speaking of the frybread, definitely get the frybread. Would I do the whole 10 mile Havasupai hike again JUST for the frybread? Honestly? Maybe! It’s super good.
I got it twice; one time I got a sweet version with honey, peanut butter, and cinnamon sugar, while the other time I got what they called the “Indian Taco” which had meat, beans, lettuce, tomato, cheese, and I added hot sauce and salsa. So good!
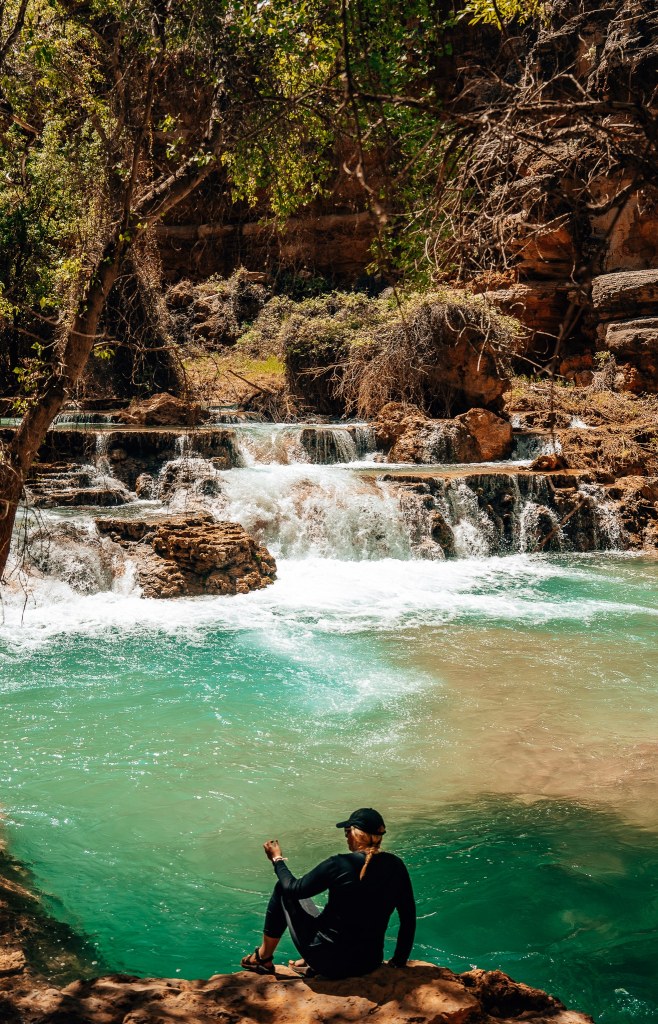
9 – Havasu Falls and Beaver Falls Are Incredible Swimming Spots
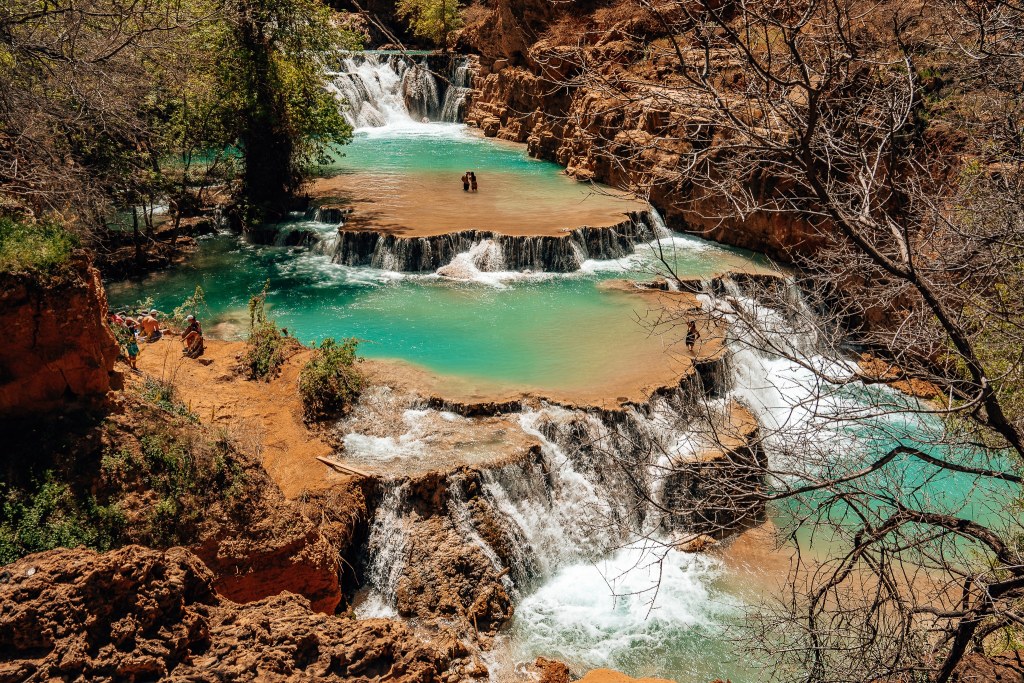
Beaver Falls is the perfect swim spot for after that long hike! Be sure to have your swimsuit in your day pack for that hike. Or wear stuff you’re perfectly fine getting into the water with. That’s what I did!
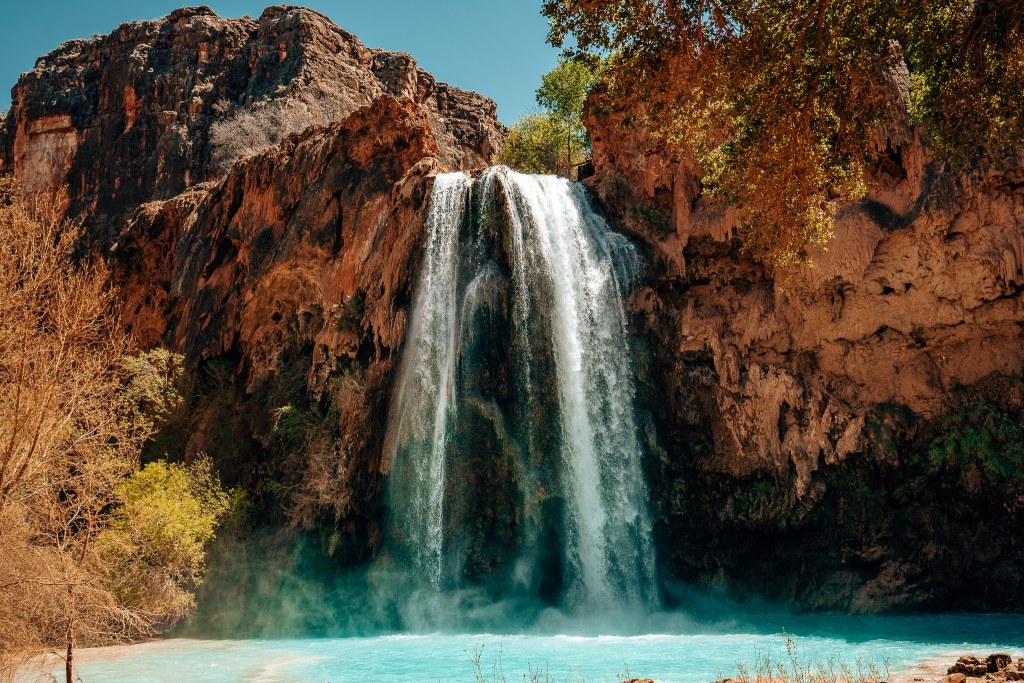
Additionally, Havasu Falls doesn’t require nearly as much of a hike to get to and is also a perfect natural swimming pool to relax and swim for an afternoon.
10 – Bring a Collapsible Water Container for the Campsite
Because you’ll hopefully be camping closer to Mooney Falls that means you’ll be a fair distance away from the natural spring water spout. So what that means is, in order to not have to walk back and forth constantly to fill your water bottle or bladder, bring a collapsible water container to fill up once or twice while you’re there and save your tired feet from some unnecessary laps around the campsite.
11 – Use the Items at the Ranger Station Left by Previous Campers You Can Use
One of the Havasupai Facebook groups mentioned that there were a ton of gas cans, bug spray, and other things left over from previous campers that could be found at the ranger station. So, we didn’t pack either of those things and just snagged some when we got there. Got rid of stuff previous campers left behind and we didn’t have to pack it down for the hike – double win!
12 – Far Left Bathroom Stall Is Storage
In each of the three bathrooms, the far left stall was both a toilet but also storage. Every time I went to the bathroom I tried to snag a toilet paper from the left one and brought it into whichever toilet I ended up using so it was continuing to get stocked up.
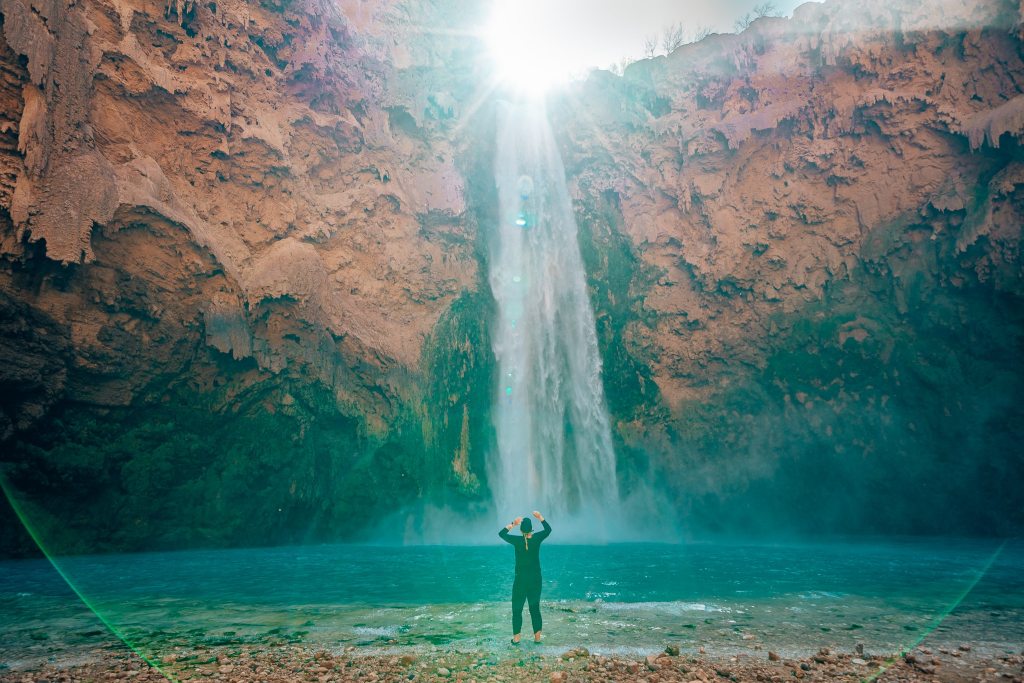
13 – The Mooney Falls Hike is As Sketchy As They Say
Now, I want to clarify by saying this was my favorite part of my entire time in Havasupai. I loved the descent down to the falls. HOWEVER, if you are scared of heights or not super experienced in hiking or climbing you might be pretty nervous to do this hike. And even further, if you’re one who freezes when scared or nervous, I might recommend skipping it all together.
The descent is wet from the waterfall spray, it’s basically straight down, you need to use the chains to go up and down, and there are no clear steps until you get down to the ladder. 12+ people are doing this climb at the same time, so it’s super important that everyone keep going. Not too fast by any means – be safe – but freezing because you’ve panicked while halfway down is going to be super hard to maneuver around for anyone.
So, truly, just think long and hard about whether you feel comfortable with this crazy hike!
14 – Wear Sturdy Hiking Boots/Shoes for the Mooney Falls Descent & Switch Into Water Shoes or Sandals for the Rest of the Hike
Due to the craziness of the Mooney Falls hike, I HIGHLY recommend wearing the hiking shoes/boots you wore when hiking down into the canyon. Once you make it down the sketchy portion, then you can switch into your water shoes or sandals. To make sure you’re as safe as possible on the Mooney Falls descent, wear the best hiking shoes you’ve got.
15 – Prepare for Multiple River Crossings
Why do I recommend switching from sturdy boots to hiking sandals or water shoes? Because you’re going to be hiking through the water quite a bit!
What I did was switch from boots to my Chacos after the Mooney Falls descent. Then I wore those for the rest of the hike to Beaver Falls. My friend wore her Tevas with thick hiking socks! Neither of us got blisters, but I was prepared to put my hiking socks back on if I needed to.
16 – Download the Havasupai Hiking Trail Route on AllTrails
I had my phone on and in airplane mode the whole time, so having downloaded the hiking trail from Hilltop all the way to Confluence was super helpful.
We actually ended up off trail a little bit on our way to Beaver Falls, so being able to check the offline map I had downloaded was super helpful.
17 – Don’t Count on the Helicopter For a Ride Out
The helicopter is an option if you don’t want to do the trek back out of the canyon. However, it is not really recommended to rely on this, because it might not fly campers out for whatever reason. There might be a lot of villagers who need to leave that day, or the helicopter might stop due to weather or other reasons. And then you’ve been waiting for hours potentially in line only to be told you have to start hiking during the heat of midday.
You can definitely try to be first in line for the helicopter out (we saw people linking up at 5am), but it’s not something I would personally do! And if it’s any comfort, hiking out was tough, but not nearly as bad as I thought it would be. So… you can do it!
18 – Check the Weather & Prepare for Chilly Nights
Make sure to be checking the weather up until the morning before you leave to be prepared for the temperatures. You’re in the desert, so while your days might be warm or hot, your nights are likely to be much chillier. So definitely keep checking out the weather and pack accordingly – layers are your best friend.
19 – Once You Arrive to the Campground, Get a Good Stretch In
The Havasupai hike is definitely a long one! The route in has some steep switchbacks, and 10 miles is a long day hike, so you’re likely to be a little sore. Once you arrive, get your campsite set up and do a good amount of stretching.
I am not joking when I tell you every person for the first day who got up from sitting at their picnic tables was all VERY clearly sore from the hike and we were all hunched over like the Hunchback of Notre Dame for a few strides. Once I got some good stretches in, my posture improved and I was significantly less sore. So definitely get some stretches in so you don’t feel so tight after finishing the Havasupai hike in!
20 – Try to Buy Any Supplies You Might Need From Town On the Hike Down to Havasupai
The hike back up to Supai from the campground is actually one of the more challenging parts of the overall hike back to the Hilltop. So, if you’re planning on getting any supplies from the store in Supai, I’d recommend grabbing them on the initial hike down!
This isn’t a MUST by any means, but as someone who was fully prepared to be exhausted and unwilling to hike one of the hard parts of the Havasupai hike again to get some snacks, we stopped on the way down.

21 – Join the Facebook Groups for More Tips & Announcements
There are two Facebook groups I recommend you join:
- Havasupai Tribe Tourism – the tribe’s official page
- Havasupai and Havasu Falls – another group with over 100K people who either are planning on going or have gone (not officially affiliated with the tribe)
You can get some really good insights from these groups, especially from people who have just gotten back from the Havasupai hike!
22 – You Won’t Have Service So Bring a Satellite Device For Communication
AT&T might get service up by the frybread or in the town, but chances are you’re not going to get it anywhere else or if you have any other cell phone provider.
So to make sure you’re able to communicate your safety and location, bring a small satellite communication device!
23 – Pack Clothes That Don’t Smell or Wrinkle
I cannot stress enough how important this is! Because you need to pack so light, you’re going to want to pack as little as possible when it comes to clothes. I literally wore this same shirt every single day, and because it was a merino wool shirt it didn’t smell at all by the end of my four days backpacking and hiking in Havasupai. I was legitimately shocked and am now a brand loyalist forever because it ABSOLUTELY should have stunk. But it didn’t because it’s a miracle shirt and I now have five.
Anything from Unbound Merino I would highly, highly recommend.

24 – Bring Something to Entertain Yourself With
You’re going to have downtime after you’ve gotten back from hiking to Beaver Falls, Mooney Falls, the Confluence, Havasu Falls, and maybe even more. And because you’re going to be tired, you’re going to want something easy and low-energy. I personally played a lot of Go Fish and had a ball.
25 – Utilize Your Red Light for Lanterns and Headlamps at Night
If you’re packing up to leave and hike out super early, or are simply up late to go to the bathroom, make sure to use the red light on your lantern or headlamps so as not to disturb the other Havasupai campers.
26 – Don’t Take Over People’s Space or Picnic Tables Who Have Clearly Set Up Camp
This is a weirdly specific thing that apparently happened to not just me, but if there is CLEARLY a tent set up next to a picnic table, don’t take over that picnic table for a wildly early breakfast when people are sleeping in the tent two feet away.
Also, don’t hang your hammock up in a way that no longer allows people to get into their own tents.
Both of these situations happened to us. Basically… just don’t take over other people’s space. There’s literally so much room at the Havaupai campground you don’t have to be hugged up onto other campers’ space.
27 – The Hike Out is Difficult, But Not As Difficult As I Expected Due to Lack of Elevation
As someone who really mostly hikes when traveling, and is mostly used to hiking in the mountains, I found the hike out of Havasupai to be less difficult than I had expected.
Don’t get me wrong, it’s tough. The first two miles out are pretty steep, then it’s about four or so miles of a steady incline, then super steep switchbacks to end the Havasupai hike. However, it’s truly not as bad as I was expecting because you’re not fighting thin air at a high elevation. I never found myself fighting for breath like I do when hiking in mountains or at higher altitudes.
When I say I was truly terrified to hike out and face those switchbacks, I am not kidding. I’ve since realized I psyched myself out SO much. I found a good breathing rhythm hiking up those switchbacks; I definitely took breaks but it wasn’t because I felt like I was dying. If I can do it, you can do it.
So there you have it, 26 of my best tips for hiking Havasupai! As always, reach out with any questions. If you have additional questions, check out my Havasupai FAQ story highlight on Instagram, my Havasupai story highlight on Insta, or my Havasupai playlist on TikTok! You’re going to have an absolute blast!
Follow Me On
Get Travel Tips to Your Inbox
Pin These Havasupai Tips for Later


One thought on “27 Tips For the Havasupai Hike • What to Know Before You Go”